Table of Contents
- Definition Of Crown Molding
- Layout And Measurements
- Essential Tools For Installation
- Cutting Techniques
- Miter Saws
- Nail Guns
- Adhesives
- Finishing Touches
- Painting Tips
- Caulking Tips
- Safety Precautions
- Steps For Installing Crown Molding
- Alternatives To Installing Crown Molding
- Cost Considerations
- Maintenance And Care
- Conclusion
Are you considering installing crown molding in your home? If so, the first thing to do is make sure you have all of the necessary tools. Crown molding can be a tricky job and having the right supplies will ensure that it’s done correctly. As an experienced home improvement expert, I’m here to tell you what exactly you need for a successful installation process.
In this article, we’ll talk about everything from power saws to miter boxes and how they contribute to getting the job done quickly and efficiently. We’ll also discuss other helpful materials such as sandpaper and drill bits that may come in handy during your project. Finally, I’ll give some tips on selecting the best type of crown molding for your space. So let’s get started!
Definition Of Crown Molding
Crown molding is a type of decorative trim that adds interest and character to any room. It’s made from wood, polyurethane, or plaster and comes in many different styles and sizes. Installing crown molding isn’t overly difficult for an intermediate do-it-yourselfer with the right tools. The most important tool you’ll need is a miter box, which will help you make clean cuts on the pieces of molding so they fit together perfectly.
A power miter saw can also be used in place of a traditional miter box but it requires more skill to use correctly. Depending on the type of crown molding being installed, other additional tools may be necessary such as coping saws, jigsaws, sanders, caulking guns, and hammers.
With the right tools on hand, installing crown molding becomes relatively simple – all that’s left is layout and measurements.
Layout And Measurements
Now that you understand what crown molding is, it’s time to get started on laying out and measuring for the installation. To do this properly, you’ll need some essential tools. The most important tool you’ll need is a tape measure. You also should invest in an angle ruler or template if you’re dealing with compound angles. It will help make sure your cuts are accurate when fitting pieces of crown molding together at degree corners.
Once all the measurements have been taken and recorded, using these tools correctly can help you create a beautiful finished product with ease. An angled ruler can be used to draw lines around the corner of the wall so that each piece fits precisely into place. And a good quality tape measure ensures that every measurement is precise so that everything looks neat and professional when completed.
You also may want to purchase some additional supplies such as nails, screws, wood glue, caulk, and mesh tape for any cracks between pieces of crown molding before painting or staining them. Having these items available in advance saves time during installation and helps ensure great results! With all these supplies ready to go, it’s time to start cutting those pieces of crown molding for installation!
Essential Tools For Installation
Installing crown molding can be a difficult task, especially when you don’t have the right tools. When it comes to installing crown molding, there are several essential power tools and other materials that need to be on hand in order to complete the job effectively and safely. These include an air gun, a finish nail gun, miter saws, pneumatic nailers, cutters or chisels, wood glue, and finishing nails.
The most important tool for installing crown molding is the air gun. This tool shoots out strong bursts of air which help secure the trim pieces into place while also providing a neat finish. A finish nail gun is used after the air gun has secured the pieces; this helps ensure that everything is securely fastened together.
Miter saws are another very important tool because they allow you to easily make precise cuts on your trim pieces with minimal effort. Pneumatic nailers provide another level of security by driving nails through thick sections of material without causing any damage to them. Finally, cutters or chisels help create clean edges on corners and other areas where precision is needed.
All these tools must be used correctly in order for the successful installation of crown molding. Additionally, wood glue should be applied before nailing pieces together as it acts as extra reinforcement which ensures a long-lasting bond between all components of your project.
Finishing nails should then be driven into each piece at an angle so that they do not come loose over time due to excessive wear and tear from everyday use. With all these tools properly utilized throughout the installation process, you will guarantee yourself a beautiful finished product! Moving onto cutting techniques.
Cutting Techniques
It’s time to get down to business, and the first step of any crown molding installation is cutting techniques. Cutting it right can be the difference between a professional-looking job and an amateur one. But don’t worry – I’m here to help you out! Let’s start with compound miter cuts: these are angled cuts that allow for joining two pieces of molding in an odd-angle situation.
The next technique we’ll discuss is coping joints: this involves hand-cutting each end of the piece of trim so that it fits perfectly against another piece. Finally, no molding project would be complete without all those tricky inside corners – they take some patience (and maybe even a few coffee breaks), but when done correctly, they result in beautiful results. Now you are ready to tackle the challenge of mastering the art of using a miter saw.
Miter Saws
When cutting wooden crown molding, a miter saw is an ideal tool to use. A miter saw allows you to make precise cuts and angles so that each piece of molding fits perfectly together in your desired design. With its ability to create accurate mitered joints, a miter saw can give you professional-looking results without having to hire an expert carpenter.
The first step when using a miter saw is selecting the correct angle for your crown molding pieces. You will want to measure the corner’s angle with a protractor or level before making any cuts. Once the angle has been determined, adjust the blade on the miter saw accordingly by loosening the knob and rotating it until it matches up with your desired measurement. Ensure all measurements are exactly as this will help ensure that your finished project looks perfect.
Once all adjustments have been made, place the piece of molding against the fence of the miter saw and slowly pull down on the handle while keeping firm pressure against both sides of the wood. Continue doing this until you finish one side of all four corners needed for installation. Afterward, double-check each cut to make sure everything lines up correctly then sand off any rough edges if necessary.
Miter Saws provide home improvement enthusiasts with precision cuts for creating beautiful projects like wooden crown moldings quickly and efficiently. By following these steps and staying mindful of safety precautions, anyone can achieve excellent results from their own DIY endeavors! Now, let’s move on to discussing how essential nail guns are for installing crown molding properly…
Nail Guns
Did you know that using a nail gun can save up to 80% of the time it takes to install crown molding? With this in mind, choosing the right type of nail gun for your project is key.
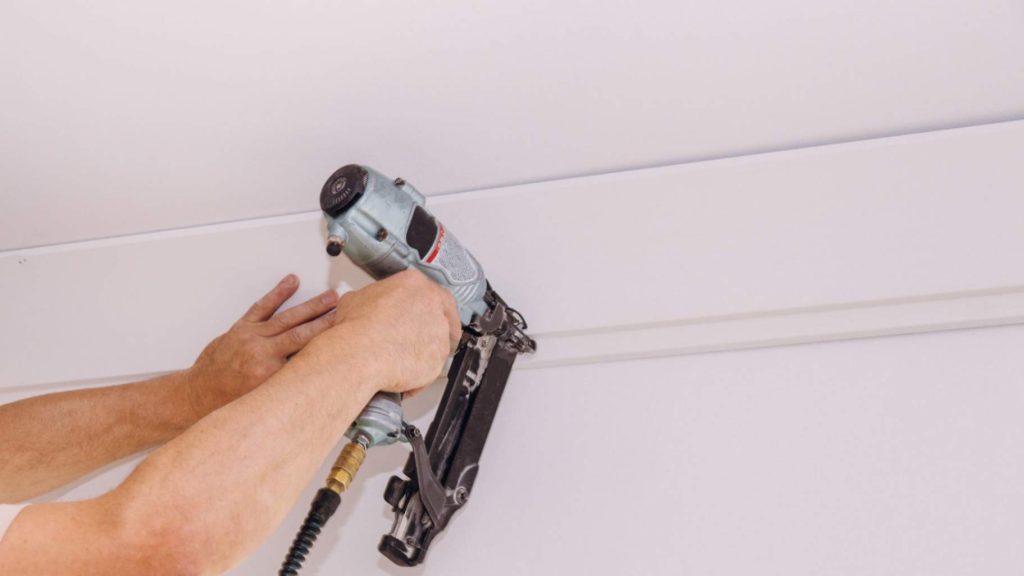
When installing crown molding, an 18-gauge nail gun is usually best. This type of nailer uses narrow finish nails between one and two inches long. A good quality 18-gauge brad nailer should provide enough power to firmly secure each piece into place without splitting or damaging the wood. For heavier materials like hardwood moldings, you may want to use a 16-gauge version with 1 ½ inch brads instead.
In addition to these types of nailers, having some smaller gauge guns on hand can be helpful too. These include a 23-gauge pin nailer for delicate pieces and even a 15-gauge angled finish nailer for tight spots that are difficult to reach with a standard straight gun. Having the right tools for any job will make it go much more smoothly!
With such an array of options available, selecting the correct size and style of the fastener is essential when installing crown molding. But no matter which one you choose, always remember safety first – wear eye protection at all times while operating any kind of power tool! Now let’s move onto adhesives as another way to securely attach the crown molding.
Adhesives
When installing crown molding, adhesives are essential for a secure fit. The most common type of adhesive used is construction glue or wood glue which should be applied to the back of each molding piece before securing it into place. If using scarf joints, an additional bead of caulk can provide extra support at the joint angle. This will also help reduce any gaps in the joinery that may appear over time due to environmental changes such as humidity or temperature fluctuations.
For a stronger and more permanent solution, you can also use polyvinyl chloride (PVC) cement when joining pieces together. PVC cement works best on interior corners with 90-degree angles; however, if you have an angled corner then construction glue will still work just fine. When applying either adhesive, always follow the manufacturer’s directions closely and make sure all surfaces are clean prior to application.
Once all the pieces are secured with adhesive and caulking, your installation is almost complete! All that’s left now are some finishing touches before enjoying your new crown molding installation.
Finishing Touches
When you’ve reached the finishing touches of your crown molding installation, there are a few more items to consider. First, you’ll need paintable caulk for filling any gaps that may have been left between your polyurethane crown molding and the walls or ceiling. Make sure you apply it with a light coat to avoid any unsightly excess material.
Next, you’ll need a finish nailer for securing the final pieces in place – this is essential as traditional nails can be easily spotted on your finished product, detracting from its overall look. Lastly, make sure to invest in a keyless shoe bevel so that all cuts will fit perfectly into their intended corners without leaving any noticeable seams. With these tools at hand, you’re ready to give your room an elegant update!
Painting Tips
“The finishing touches to a room can make or break the design. As they say, ‘the devil is in the details’. Installing crown molding requires several tools, such as miter saws, table saws, and power drills. But before you install your polyurethane moldings, it’s important to make sure that your walls are freshly painted with good-quality latex paint. After painting the walls, use painter’s caulk along their edges for added protection against moisture buildup.

When it comes time to apply a coat of finish on the crown molding itself, there are two options: late-paint combination paints (usually oil-based) or simple wood stains. If you choose combination paints, be sure to give each coat adequate drying time between applications so that any blemishes will not appear in the finished product. Wood stain also works well and gives off an attractive natural look; however, it may require more coats than combo paints do.
Finally, when everything has been installed and dried properly – don’t forget to admire your work! With just a few extra steps taken at this stage of the project, you’ll have beautiful results that will last for years.”
Caulking Tips
When installing crown molding, it is important to apply a proper sealant along the joints of the trim. Caulking is an essential part of any trim installation project and will help protect your moldings from moisture damage. Here are some helpful tips for caulking:
Tools Needed: To properly caulk, you’ll need a few key tools including:
- Trim Installation Tools such as a saw, miter box, hammer, nail setter, and chisel.
- Air Tools like an air compressor and nail gun can also be useful when applying caulk.
- A good quality caulking gun that fits the size tube or cartridge of caulk you’re using.
Application Process: Once you have all the necessary supplies on hand, here’s how to proceed with caulking your piece of molding:
- Start by cutting away any existing caulk residue or paint buildup around the joint.
- Fill in cracks and holes with wood putty if needed before beginning to apply new caulk.
- Cut off the tip of the caulking tube at a 45-degree angle so that there is enough flow but not too much pressure applied during the application process.
- Apply even amounts of pressure while squeezing out equal lines of caulk along each side of the joint where two pieces meet together – this will form a sealed bond between them once dried completely.
5 Make sure to use gloves when handling caulk and clean up any excess quickly as it hardens fast!
Once finished with completing these tasks for ensuring correct caulking techniques, safety precautions should always be taken into consideration prior to starting any home improvement projects involving power tools or hazardous materials – make sure to read instructions carefully first and wear appropriate clothing/eye protection while working near potentially dangerous areas in order to avoid potential injury or harm
Safety Precautions
Safety is paramount when it comes to installing crown molding. As the old adage goes, ‘don’t try to be a hero’ and always be sure you have all of the necessary tools before beginning any work on your home improvement project. It’s important to understand which high-quality tools are required for each step in order to ensure that your project does not fall short due to a lack of proper preparation.
First, make sure that you have an adequate number of nails and pre-drill ail holes where needed depending on whether you’re working with hardwood floors or another type of surface material. A nail punch can also come in handy if you need to drive in nails at awkward angles or into tight corners.
Next, use either manual gauge nailers or automated pneumatic guns for larger projects as they provide greater accuracy and precision than hand nailing alone. Finally, wear safety goggles and gloves throughout the process – no matter how experienced you may think you are!
| Tools | Reason For Use |
|---|---|
| Nails/Pre-Drills | Secures Crown Molding To Wall/Floor |
| Nail Punch | Driving Nails Into Awkward Angles & Tight Corners |
| Gauge Nailer | Greater Accuracy & Precision Than Hand Nailing Alone |
| Safety Goggles/Gloves | Protection From Injury During the Installation Process |
In addition to these essential items, take some time beforehand to assess the area that will be receiving crown molding and measure properly so everything fits together perfectly once installation begins. Following this advice should help keep everyone safe while ensuring a successful installation every time.
Steps For Installing Crown Molding
Installing crown molding is not a difficult task, but it does require some preparation. To begin with, you’ll need the right tools for the job. Specifically, you will need an air gun and nails to secure your miles of crown molding into place. You should also have a miter saw available so that you can make accurate angled cuts when joining two pieces of molding together at square corners.
When preparing to install your crown molding, be sure to measure twice and cut once in order to ensure a precise fit. Calculating angles is important as well – if done incorrectly, your crown molding won’t look as good as it could! Here are three tips to keep in mind while installing:
- Have all materials on hand prior to starting work
- Take extra time measuring and calculating angles correctly
- Double-check each piece before nailing it into place
Once everything is measured and cut properly, the rest is easy – just follow along the wall or ceiling line until complete! With proper planning and patience, anyone can learn how to successfully install their own crown molding quickly and easily.
Alternatives To Installing Crown Molding
While “measure twice, cut once” rings true for installing crown molding, sometimes it can be difficult to get the desired results with this traditional method. Professionally installed crown molding is often made of expensive material and requires precise cuts where each piece of molding meets at an angle. For those looking for a less labor-intensive approach or who don’t have access to specialized tools, pneumatic options are also available.
These alternatives may not provide the same level of aesthetic appeal as traditionally installed crown molding but require far less skill and time investment. Additionally, many companies sell pre-cut trim pieces that fit together easily without requiring any special cutting tools. These trims offer a variety of styles from simple flat designs to more intricate shapes that include a bevel feature along the edges.
Cost considerations will likely play into which route you take when choosing between a DIY installation or hiring professionals to install your crown molding. Taking on the project yourself may save money in the short term but could end up costing much more if done incorrectly due to additional materials needed for repairs or replacement. On the other hand, having professionally installed crown molding means peace of mind knowing it was done right the first time around.
Cost Considerations
When it comes to budgeting for a crown molding installation, there are several cost considerations. Labor costs will vary based on the complexity of your project and how much cutting is involved in the process. On average, labor can range from $100-$500 per day, depending on the size of the job. Additionally, you’ll need tools to complete the installation which can be an expensive option if purchased separately; however, some may already be included in the cost of a professional’s services.
| Tool | Cost |
|---|---|
| Miter Saw | $200+ |
| Coping Saw | $20-50 |
| Level or Laser Level | $30-80 |
| Cordless Drill/Driver Combo Kit with Bits | $150+ |
| Hammer & Nails or Nail Gun w/ Compressor (if needed) | $$125+ |
The right tools make all the difference when installing crown molding. A miter saw is required to make precision cuts at various angles while a coping saw is used for intricate work along corners and edges where two pieces meet. To ensure accuracy during installation, you’ll also want to invest in a level or laser level so everything hangs straight and even once installed.
Lastly, cordless drills with bits are great for drilling pilot holes into the wood before nailing them into place while hammers and nails or nail guns with compressors can help speed up the overall process.
Overall, investing in quality tools upfront will save time and money down the road as well as provide better results than using low-cost alternatives that might not last very long. The key is finding the balance between affordability and durability that works best for your particular project needs.
With careful consideration of these factors, you’ll have no problem staying within your budget when completing any crown molding installation project successfully. With proper maintenance and care over time, your newly installed crown moldings should remain to look beautiful for years to come.
Maintenance And Care
Maintaining and caring for crown molding is relatively easy. To begin, you’ll need to have the right tools on hand. A miter saw will be needed to accurately cut angles at a 45º angle outside corners. Additionally, an electric drill with various-sized bits should also be present in order to create holes for nails without splitting the wood.
Finally, 3/4” inch finishing nails are typically used when installing crown molding as they provide enough strength to hold it in place while not being too large that they detract from its aesthetic appeal. With these three items available, your crown molding installation process should go smoothly and last for many years with minimal maintenance or upkeep required.
Once installed, proper cleaning of your crown molding is essential for keeping it looking great over time. Use a damp cloth or brush to lightly clean off any dust or dirt buildup that may occur along the edges and crevices of the trim piece itself. For tougher stains such as grease spots or paint splatters, use some mild soap mixed with warm water and gently scrub away until all marks have been removed.
After cleaning, quickly dry the surface with a soft cloth so that no moisture remains which could lead to warping or discoloration of the material over time. By following these simple steps regularly, you can extend the life of your crown molding and ensure its beauty stays intact for years to come!
Conclusion
In conclusion, installing crown molding is a rewarding and cost-effective way to enhance any room. With the right tools and skills, you can easily create a beautiful look that will last for years – even decades! Plus, with proper maintenance and care, your crown molding will remain in excellent condition for as long as you own it.
My advice? Don’t be intimidated by the process – take your time, use quality materials, and always wear protective gear when cutting wood. And don’t forget – practice makes perfect! As an experienced home improvement expert, I promise that if you follow these steps carefully, you’ll have stunningly gorgeous crown molding before you know it. So go ahead – give it a try; you won’t regret it!